My WordPress blog crashed when I tried updating it to the new Version 5.0. I swear I could hear a woman screaming in the background when I realized that everything stopped working. It also turned out to be way more difficult to recover than expected because I was running multi-site on it.
Gutenberg simply crashed everything
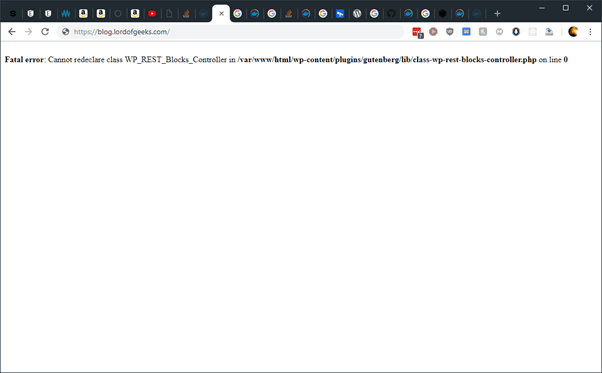
Basically, the new version of WordPress refused to play nice with the presumably outdated version of Gutenberg I have running on my semi-neglected blog. It crashed everything, including my other private sites I have running on this installation.
Part 1 – Problem
I tried to recover the site by removing the conflicting files, changing the class names, basically meddling with the code itself to get it working but to no avail. This was made especially difficult because this blog is hosted on a Docker instance. The Docker image has limited tools and it’s definitely not ideal for trying to troubleshoot code issues. It is also tedious to try and import files into the instance because hey, containers are a thing.
Thankfully, I had the brains to follow some best practices and the data for the container is mounted on a Docker volume. This means that in theory, I could stop this container, and spin up another container, attach the volume, and voila everything should work! Right…? Right?! Nope.
Turns out the upgrade (unsurprisingly) changed some core WordPress files, which meant that the Gutenberg issue rears its ugly face yet again. With no clear answers from my best pal Google and Stackoverflow, I had to do a full migration from the old container to a fresh new one.
Part 2 – Export
The migration started off with the wrong foot, right off the start.
docker stop blog
docker rm blog
I was an idiot to remove the old container, because, even thought it was attached to a volume (no data lost), the old me apparently botched up the name creation process.
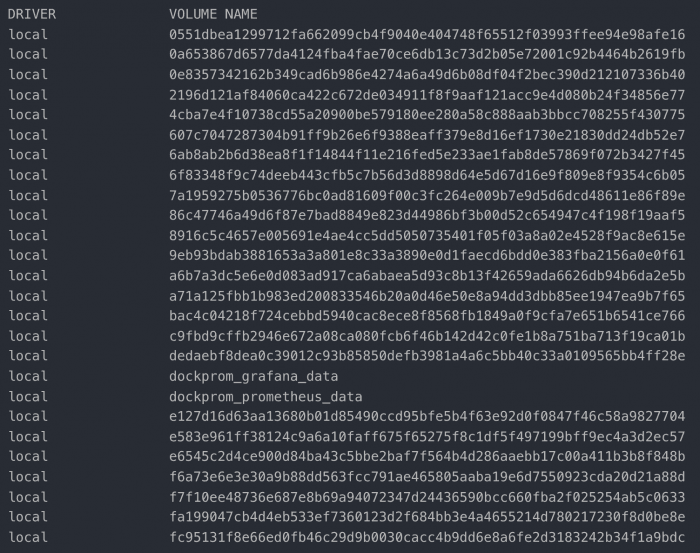
Suffice to say, mistakes were made. Because the original container was removed, I now have no way of programmatically figure out which volume holds my WordPress data. And I faced another problem, there was no native way of exporting data from within a Docker volume out into the host machine. Fortunately, the internet came to the rescue with a rather interesting solution.
docker run --rm \
-v VOLUMENAME:/volume \
-vpwd/exports:/exports \
busybox sh -c 'cp -r /volume /exports'
Create a busybox container, mount the volume, then map a path from the host, then do a simple cp command! This worked brilliantly, I just have to run this with all the volumes until I find the correct output. I’m eternally grateful that it was the 5th volume, else this could take a really, really long time.
Lastly, I had to migrate the database. Ran into a little issue because it was a self-contained DB. It means that it’s only supposed to within the local Docker network with no exposed ports. Solution was pretty simple, run a phpmyadmin container to connect to it internally, then expose the data out. This was relatively painless.
Part 3 – Import
This actually ties into something I want to make a separate post about, because I have shifted this blog from my personal server to the cloud (hooray!).
For the WordPress portion, it was relatively painless, most of the issues was to do with Nginx configuration and SSL weirdness, but it was all solved in the end. I used a a plugin called All-in-One WP Migration because it’s far easier to do that than to do it myself manually.
Actually there was a portion that was a pain. By default, I prefer mounting host volumes on Docker cause it’s easier to manage, however I run into permission issues far more often than I’d like. This lead me to creating a properly-named volume and attaching it to my container. But this means I had to use the little hack to import the data back into WordPress, and it looks a little like this.
docker run --rm \
-v /home/log/exports/volume/wp-content/uploads/:/imports \
-v dedaebf8dea0c39012c93b85850defb3981a4a6c5bb40c33a0109565bb4ff28e:/temp \
busybox sh -c 'cp -r /imports /temp'
All in all, it worked out in the end, and if you’re able to read this, it means that the migration was successful.
Lesson learnt
Back up my stuffs, and test my backups. I realize that I require disaster recovery plans in addition to normal backups. It would’ve saved me so much time and panic if there was a “one-click-recovery” if I actually spend the time doing it. That’s something that I’ll go into my next post, till then!