After migrating this blog to self-hosted, I thought about how to monitor its up time and to get some notifications if it ever went down. I’ve been using uptimerobot for the longest time and it has worked well for many years, like at least 6 years. It’s time to self-host this as well.
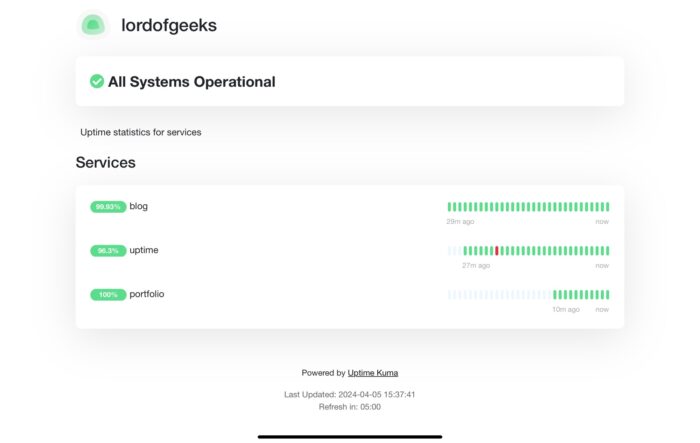
I chanced upon uptime-kuma which is a popular open source self-hosted monitoring tool. Setting up was extremely easy with docker-compose and I got it up and running in minutes. Set up another simple telegram bot and now I have a pretty robust notification system if any of my sites went down.
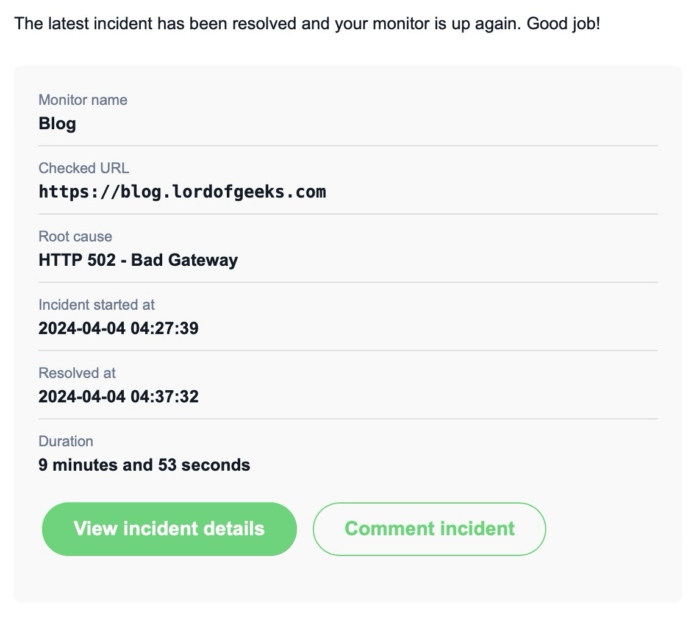
when I accidentally removed the DNS entry for uptime
It is so easy to setup that there’s no reason for anyone to not monitor their sites. My favourite part is that it actually looks pretty good!
The docker-compose.yml example that the repo gives is everything you need, though your mileage will certainly vary once you take into account your own networking configurations.
Give it a try and have fun monitoring your own sites!
Mainly cost 💸. The price has went up >230% since the last time I paid for it. It’s the difference between paying $44.16 vs $104.62 (after discounts) for 48 months of hosting. For something that I barely use, or have barely any traffic in, there’s little to no incentive for me to pay ~$2.18 usd/month for this blog.
Current
Renewed
Yearly (usd)
$44.16
$104.62
Monthly (usd)
$0.92
$2.18
“Well surely self-hosted can’t be free right?”
You’re right, it isn’t “free” per se, but because I have a home lab server running anyway, I might as well use the spare capacity to host the blog. (again, the home lab is something I should write about, hopefully next week)
It took me about an hour to fully migrate over, it was a smooth process with a tiny bit of pain (self-inflicted carelessness).
The home lab is a mini pc, with a measly Intel N100 CPU, along with 16GB of ram and and 500GB SSD. I am shocked to find out how many services it can host comfortably, it has completely changed my view on what’s possible with these small machines.
This blog is hosted on docker as expected. But it’s a Docker container, inside of a Ubuntu VM, inside of a Proxmox host. The idle stats are pretty decent, consuming about 1GB of RAM.
NAME            CPU %     MEM USAGE / LIMIT     MEM %     NET I/O           BLOCK I/O
wordpress       0.01%     355.5MiB / 7.752GiB   4.48%     4.12GB / 288MB    75.8MB / 2.25GB
wordpress-db    0.71%     533.6MiB / 7.752GiB   6.72%     78.8MB / 3.6GB    3.45MB / 1.87GB
To make this work we employ the usual caching strategies and pre-load the pages to make sure that they are already cached on server and ready to go.
WordPress: Some kind of caching plugin, e.g. WP-Optimize + Jetpack
CDN: Cloudflare
While setting this up I also found out that there is Redis object caching for WordPress, but it seems like it’s only useful if my site has many reads from the database. Based on my gut feel, I doubt it, so I’m omitting Redis until the day when this setup cannot handle it anymore.
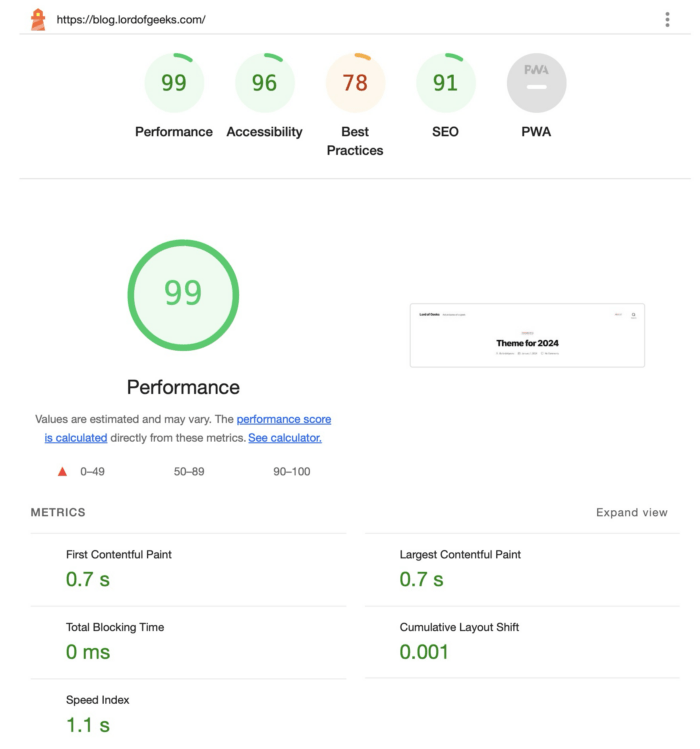
All things considered, pretty good performance!
lighthouse report from chrome: 99 performance
Of course, I’ve no idea how this’ll perform under load but given that there’s barely any dynamic content on this site, it’s unlikely that this setup will buckle under any typical loads.
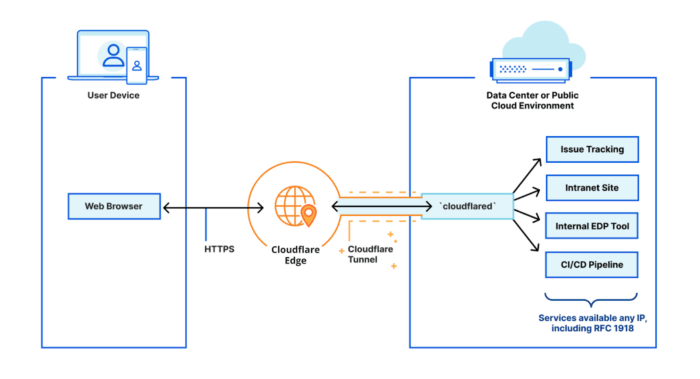
To expose this blog over the internet, it’s done with Cloudflare Tunnel, which saves me the typical hassle of securing the connection to my server with origin certificates.
It’s secure and easy to setup, would recommend anyone who wants to host public services with it. There is one major caveat: Cloudflare would be able to see all traffic between your origin server and Cloudflare, so you have to trust Cloudflare. Honestly, it’s kind of inevitable that you have to place your trust on someone or something. Given their track record of transparency when there are downtime or when shit hits the fan, they’ve earned my trust.
While I was aiming for zero-downtime, unfortunately, there was about 10 minutes of downtime.
the importance of uptime monitoring, which I’m planning to self-host in the near future
I had my new site up and running and it was a simple DNS cutover. Unfortunately, I forgot to take into account DNS propagation time, and clients that got the old IP ended up not being able to reach the site. To be honest I still don’t understand why it failed because it should still show the old site and seamlessly switch over when the new DNS kicks in. Let me know in the comments if you have any ideas!
Summary 📖
Thanks to the beauty of virtualisation, I’ve saved myself $104.62 usd over 4 years. If this mini pc server lasts anywhere as long as that, it would’ve paid for itself plus interest (including the other services that it’s hosting).
Now., on to figuring out an automated backup solution…